|
Cut Areas
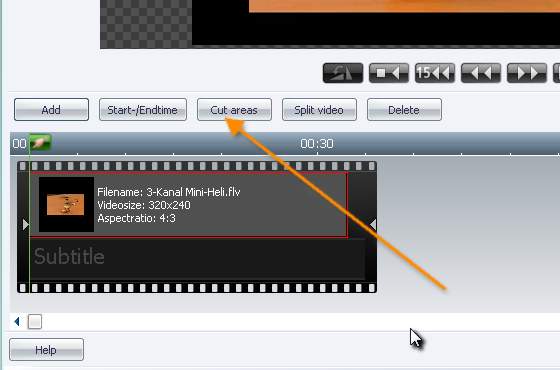
Many films are ruined by advertisements, trailers or unnecessary lengths. If you want to remove those parts this is the feature to do so. Just enter the Movie Editor, add a movie and select the Cut areas button (s. picture below).
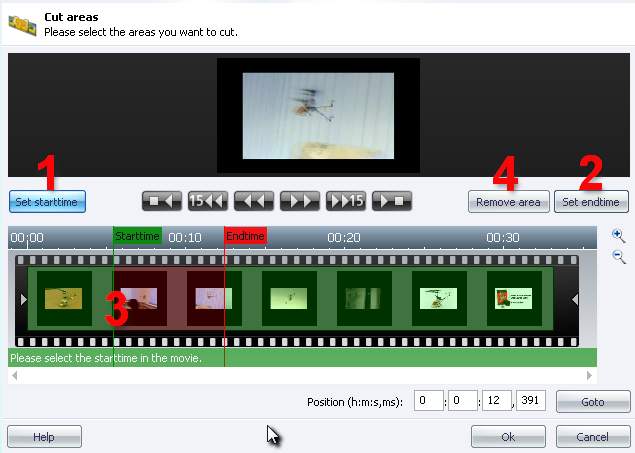
A new editor opens in which you can set up the start- and endtime of the area which will be deleated in just a few clicks. To start the process you have to define the starting point the area. The Set starttime button (s. picture below, (1)) is activated by default, so you just need a left mouse click to define it. The starttime will be symbolized by a green line and flag (3). If there are problems to pick up this moment correctly, please take a look at Navigate through a movie.
Now is turn time to define the endtime of the area to be deleted. There are two options: a) click on Set endtime (2) and click left to set up the endtime. b) Just right-click at the proper time to set up the endtime. The endtime is now symbolized by a red line and flag.
Once you’ve defined an area it will look like the one one the picture above. click on Remove area (4) and it will be displayed in a much brighter red, it is now indicated as deleted area. click on OK to proceed and you’ll return to Movie Editor, the deleted scene will be already gone.
There is also the possibility to remove multiple areas. Just repeat the steps which were described above (define start- and endtime, remove area). You’ll see several red areas which show the different deleted scenes. After you’re finished, just click on OK to proceed.
|

